Getting the Perfect Scallop
DIY Scalloping Tutorial With Pictures!
Here's what you'll need:
-A curved metal ruler OR something rounded to trace
-Chalk pen OR fabric marker
-Small detailing scissors
-Seam ripper
-Non-stretch fabric
-Steam iron
-Sewing machine
I have found that the absolute key to creating even and smoothly rounded scalloping is a metal Varied Curve Form ruler, or a metal French Curve. Plastic is not as helpful because you can't press them--something I will explain later. This is not a crucial tool, but I highly recommend it, especially for the perfectionists among us.
If you do not have one of these rulers, find a traceable object that has the size curve you desire. Spools of thread, mugs, bowls, and jars all work well for tracing.
First, MAKE A PLAN.
When deciding what size scallop you'd like to create, be sure to measure the distance you'll be scalloping so that the scallops fit exactly into the desired space, and you don't end up with a half scallop, or a tiny scallop, at the end. Then use your ruler to trace a row of even curves along the edge of the fabric you would like to scallop. Your chalk marks should be on the wrong side of your material, and your fabric should be folded right sides together. For the purposes of this post I'm going to assuming we are scalloping a hem, though neck lines and cut-outs look gorgeous scalloped as well.
The smaller scallops you choose, the more difficult they will be to execute, to keep curved, and to keep even. Mark the intersection of each curve. This must be at least 1 inch below the edge of your fabric, or else your scallops won't be connected.
Next, you want to stitch along you chalked line using a straight and short stitch.
Do not stitch above the marked intersections.
When sewing scallops and other small curves--such a pater-pan collar--you want to shorten your stitch length. I generally use a length of 0.5, but you may want to adjust this depending on what fabric you are using. As you sew, be sure you are pivoting at the point where each curve intersects. With your needle in the down position (so it will hold your project in place and keep your line of stitching unbroken) lift your presser foot and rotate the fabric in order to follow your chalked line. Put the presser foot back down and sew the next curve, repeating the pivot at every intersection.
Now snip the excess fabric. Cut about 1/4" below stitching.
Finally, make a tiny little snip directly at the crest of the point, creating a notch when the fabric is splayed. Be sure not to snip you seam. Also notch around the seam allowance of each curve. This allows the scallop to lay flat when turned right-side-out. Because the curve around the seam allowance contains more fabric than the curve of the the stitching, without the notches the seam allowance will be forced to bunch in order to fit into the curve of the stitches. This would cause bumps and small flat areas in your scallops.
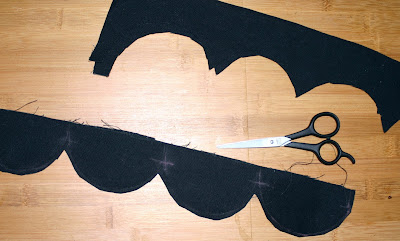
Next, turn all of your scallops right side out. You'll end up with a somewhat messy looking string of scallops that looks something like this:
Now begins the finicky annoying part that is infinitely helped by your metal ruler: Flattening your scallops exactly on the seam.
UGH.
Begin by making sure each crest is fully turned out. Here is where my technique deviates from others'. If I have trouble turning out a certain corner, I take my seam ripper and rip out one single stitch around the crest of the intersection (the spot where you pivoted). As you attempt to turn your scallops, you will be able to see which stitches are preventing the fabric from laying flat. That's the one you want to rip out. This instantly allows the crest to lay flat when turned out. KEEP IN MIND that if you use this technique, you must top stitch your scallops to finish your project, otherwise your seam may pull out.
Here is a scallop that needs to be seam ripped:
Now take your curved ruler and use it to push the curve out evenly. Use a steam iron to press flat while the ruler is still in the scallop.
Here is a scallop that needs to be seam ripped:
Here is a scallop that is laying flat:
Now take your curved ruler and use it to push the curve out evenly. Use a steam iron to press flat while the ruler is still in the scallop.
Lastly, top stitch the edge of your scalloping using a straight, normal length stitch.
In the end, you should have beautiful & smooth scalloping.
Forever yours with pricked fingers and pins in her mouth,
Kelsey


No comments:
Post a Comment